Unable to Import Profiles into Multiple Clients on the same system
If you are unable to import a profiles(SAP_ALL) transport into multiple clients on the same system (Say you wanted to import the user master into multiple clients on an ECC system) and it gives you the “Release of export and import systems have to be identical’ error. (as shown below) in STMS when you try to import into a second client
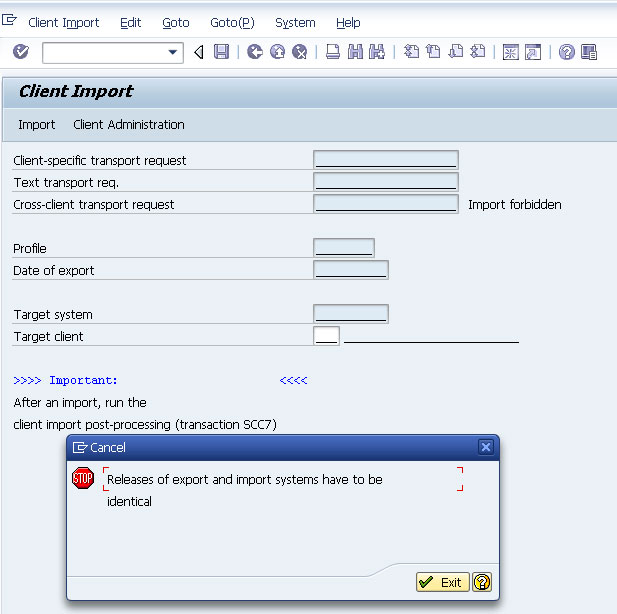
You need to manually force the transport into the system using the TP command. Do the following:
1. Remote into an application server for the appropriate system
2. Launch a command prompt. Navigate to the D:\usr\sap\trans\bin directory
cd D:\usr\sap\trans\bin
3. Now run the following command (replacing the SID. Transport ID and client number as appropriate)
D:\usr\sap\SID\SYS\exe\uc\NTAMD64\tp.exe import TRANSPORTID SID client###U128 pf=D:\usr\sap\trans\bin\TP_DOMAIN_SID.PFL
It will take a few minutes to complete the import.
You know it is imported when the command window goes away. Now you can run SCC7 to complete the post-processing as normal. Repeat on other clients as necessary
Source:https://blogs.sap.com/2013/07/26/unable-to-import-user-master-into-multiple-clients-on-the-same-system/
Ø How to import a transport manually with TP program?
Ø How to import a transport without using STMS in SAP?
Ø How to import a transport at Os level in SAP ?
Ø How to insert a request into the import queue of an SAP R/3 system manually?
Ø When performing a request import manually, what will happen if client is not mentioned?
Ø Can we manually import all the requests that are present in the import queue of an SAP system? If so, how ?
Ø What is the parameter file name which was similar to TP_.PFL file which was used in older SAP versions?
Ø What will happen in the background if a transport request is added to the import queue of an SAP system ?
Ø What will happen if the client in which you want to import does not exist in the target system?
———————————————————————————————–
Sometimes, there will be situations like you have to process transport imports manually. This can be done by TP program from the operating system level.
Transport control program TP is controlled by a parameter file TP_.PFL which is present under bin subdirectory of the transport directory.
Please note in older releases of SAP R/3, the file is termed as TPPARAM.
Before using TP for the first time, it is suggested to test the connection to the desired target system.
To perform this test, following command can be used.
tp connect <target system> pf=<complete path of the parameter file>
If this test results are fine you can proceed further otherwise you need to troubleshoot the same and identify the reason for the same.
In order to insert a request into the import queue of an SAP R/3 system, use the following command:
tp addtobuffer <request> <target system> pf=<complete path of the parameter file>
If the above command is successful then, data file and cofile of the request will get copied under respective data subdirectory and cofiles subdirectory of the transport directory.
As the request is inserted to the import queue, it can now be imported using the following command.
tp import <request> <target system> pf=<complete path of the parameter file>
In case you would like to import all the requests that are present in the import queue of an SAP system in the current sequence then provide the following command at oslevel.
tp import all <target system> pf=<complete path of the parameter file>
You can add the following to specify a specific client for import:
client = <number of the client>
If the client is not mentioned, the data is copied to the client with the same number as the client from which the data was exported.
If the client into which you would like to import a request does not exist in the target system, the import terminates with an error message.
- Make sure the transport request is released from the source system. Log onto the target systemas adm.
- To add the transport request to the buffer(Single command line).
| tp addtobuffer Client= |
| pf=/usr/sap/trans/bin/TP_DOMAIN_.PFL |
Example:
| tp addtobuffer DEV12345 QAS Client=000 |
| pf=/usr/sap/trans/bin/TP_DOMAIN_DEV.PFL |
- To import the transport request(Single command line).
| tp pf=/usr/sap/trans/bin/TP_DOMAIN_.PFL |
| import U128 client= |
Example:
| tp pf=/usr/sap/trans/bin/TP_DOMAIN_DEV.PFL |
| import DEV12345 QAS U128 client=000 |
Related
Script for shutting down and starting all services of in ABAP environment
shutting down;
# Script for shutting down all services of <sid>
# In case of abnormal shutdown, delete .sapstream*,.sapstartsrv* .oracle aaa* etc from /tmp before starting again
su – <sid>adm -c stopsap -t r3
su – <sid>adm -c stopsap -t db
su – <sid>adm -c /usr/sap/<SID>/DVEBMGS<INR>/exe/sapcontrol -prot NI_HTTP -nr <INR> -function Stop
/usr/sap/hostctrl/exe/saphostexec -stop pf=/usr/sap/hostctrl/exe/host_profile
su – daaadm -c stopsap all
su – daaadm -c sapcontrol -nr <INR> -prot NI_HTTP -function StopService
/usr/sap/hostctrl/exe/saposcol -k
su – ora<sid> -c lsnrctl stop LISTENER_<SID>
# Use kill -2 to remove sapcontrol pid
STARTING;
# Script for starting all services of eccdb server
# Start oracle using ora<sid> user
# In case of abnormal shutdown, delete .sapstream*,.sapstartsrv* .oracle aaa* etc from /tmp before starting again
su – ora<sid> -c lsnrctl start LISTENER_<SID>
su – <sid>adm -c /usr/sap/<SID>/DVEBMGS<INR>/exe/sapcontrol -prot NI_HTTP -nr <INR> -function Start
su – <sid>adm -c startsap -t db
su – <sid>adm -c startsap -t r3
/usr/sap/hostctrl/exe/saphostexec -start pf=/usr/sap/hostctrl/exe/host_profile
/usr/sap/hostctrl/exe/saposcol -l
su – daaadm -c sapcontrol -nr 98 -function Start
su – daaadm -c startsap all
# If the instance doesn’t start the first time, run the ./<sid>stop.sh script again, remove the sapstartsrv sessions using kill
-2 option
App servers;
start:
# Script for starting all services of <SID> App servers
su – <sid>adm -c /usr/sap/<SID>/D11/exe/sapcontrol -prot NI_HTTP -nr <INR> -function Start
su – <sid>adm -c startsap -t r3
/usr/sap/hostctrl/exe/saphostexec -start pf=/usr/sap/hostctrl/exe/host_profile
/usr/sap/hostctrl/exe/saposcol -l
su – daaadm -c startsap all
stop;
# Script for shutting down all services of <SID> App servers
su – <sid>adm -c stopsap -t r3
su – <sid>adm -c /usr/sap/<SID>/D11/exe/sapcontrol -prot NI_HTTP -nr <INR> -function Stop
/usr/sap/hostctrl/exe/saphostexec -stop pf=/usr/sap/hostctrl/exe/host_profile
/usr/sap/hostctrl/exe/saposcol -k
su – daaadm -c stopsap all
su – daaadm -c sapcontrol -nr 98 -prot NI_HTTP -function StopService
SAP with Oracle Homogeneous System Copy
1.Make sure which character set the source system is used.
SELECT * FROM V$NLS_PARAMETERS
2.Make an offline backup.
database schema and tablespace name cannot be changed.
3.Other prerequisites
Same Oracle release and patch level for the database in source and target system.
The ojdbc14.jar must exist in the /ORACLE/client/10x_64/instantclient(Standard Oracle installation)
JRE version 1.4 must be inatalled and JAVA_HOME should point to the JRE directory.
The source and target systems must run on different hosts for security resons.
The source and target systems must be binary compatible.
4.Generate the Control File Structure
Create an installation directory with permissions 777 on the source system
Copy the OraBRCOPY.SAR from Installation Master DVD to the installation directory.
Start the OraBRCopy tool as ora or sidadm
If you perform an offline manual copy, enter the following commands:
On UNIX:
./ora_br_copy.sh –generateFiles –forceLogSwitches —targetSid —password —listenerPort
On Windows:
ora_br_copy.bat –generateFiles –forceLogSwitches —targetSid —password —listenerPort
The tool creates the files CONTROL.SQL, CONTROL.TRC and init.ora in your installation directory, shuts down and restarts the database and performs the required log switches.
If you perform an offline or online backup using BR*Tools, enter the following commands:
On UNIX:
./ora_br_copy.sh –generateFiles —targetSid —password —listenerPort
On Windows:
ora_br_copy.bat –generateFiles —targetSid —password —listenerPort
The tool creates the files CONTROL.SQL, CONTROL.TRC and init.ora in your installation directory, and performs the required log switches.
If an error occurs, check the log file:
/ora.brcopy.log
compare the sql file to the trace file.
5.Create a database backup if required.
There are different possibilities to prepare the actual transfer of the database files:
If you have an up-to-date offline backup, you can use it (provided that redo logs were cleaned up with forced log switches).
If you want to transport the database file (for example, on tape) or if you have to perform the database shutdown at a certain time, stop the database (normal shutdown) and perform a complete offline backup. You can use the trace file CONTROL.TRC created by OraBrCOPY to
determine the file system trees that have to be saved.
You stop the database (normal shutdown) and copy the database files when the actual transfer to the target system takes place. You do not have to perform any preparations for the actual transfer now. Proceed with the next step.
Note
If you choose this manual offline backup method, you also have to restore the database files on
the target system manually.
6.Target system.
Make sure the disk space is enough for the database.
Perform system copy installation with SAPinst
Make sure the following directory exsit on the target system.
UNIX:
/oracle//mirrlog
/oracle//origlog
/oracle//sapdata
/oracle//sapreorg
/oracle//saparch
/oracle//oraarch
/oracle//saptrace
/oracle//saptrace/background
/oracle//saptrace/usertrace
/oracle//origlogA/cntrl
/oracle//sapdata1/cntrl
/oracle//saparch/cntrl
/oracle//sapcheck
Windows:
:\oracle\\mirrlog
:\oracle\\origlog
:\oracle\\sapdata
:\oracle\\sapreorg
:\oracle\\saparch
:\oracle\\oraarch
:\oracle\\saptrace
:\oracle\\saptrace\background
:\oracle\\saptrace\usertrace
:\oracle\\origlogA\cntrl
:\oracle\\sapdata1\cntrl
:\oracle\\saparch\cntrl
:\oracle\\sapcheck
chown ora:dba
Make sure the following directory is empty
/oracle//saparch and /oracle//oraarch
:\oracle\\saparch and :\oracle\\oraarch
Set the security settings for the built-in accounts and groups SYSTEM, Administrators, SAP__GlobalAdmin (domain installation), and SAP__LocalAdmin (local installation) for all directories as follows:
a) In the Windows Explorer, right-click the Oracle root directory and choose Properties.
b) Under Security, choose Advanced.
c) Uncheck Allow inheritable permissions from the parent….
d) In the next dialog, choose Copy to copy the permission entries that were previously applied from the parent to this object.
e) Choose OK.
f) Set the permissions for the above-mentioned accounts SYSTEM, Administrators, SAP__GlobalAdmin, or SAP__LocalAdmin to Full Control.
g) Delete all other accounts.
restore database manually
a. Copy the following files from the source to the target system host by copying the listed files from
the source directories to the target directories.
Directories on UNIX:
Source and Target Directory Files
/oracle//sapdata All files
/oracle//origlog All files
/oracle//mirrlog All files
source:
target:
CONTROL.SQL
source:
target: /oracle//_/dbs
init.ora
Directories on Windows:
Source and Target Directory Files
:\oracle\\sapdata All files
:\oracle\\origlog All files
:\oracle\\mirrlog All files
source:
target:
CONTROL.SQL
source:
target: \oracle\\_\database
init.ora
Note
The installation directory of the target system is normally located in the directory:
%programfiles%\sapinst_instdir\NW04S\LM\COPY\ORACLE\SYSTEM\
- After you have copied the database files, make sure that the files on the source and target system are not located in different directories or drives. If required, make the corresponding changes in the files control.sql and the init.ora.
c. Verify that the created directories and copied files have the owner ora, belong to the group dba, and have the permissions 740.
d. Make sure that the control files are not restored. If necessary, remove them. The file names are specified by the parameter control_files of the init.ora file.
Restore with BRtools
a.Copy the following files from the source system host to the target system host by copying the listed
files from the source directories to the target directories manually.
On UNIX:
Source and Target Directory Files
source:
target:
CONTROL.SQL
source:
target:
/oracle//_/dbs
init.ora
On Windows:
Source and Target Directory Files
source:
target:
CONTROL.SQL
source:
target: \oracle\\_\database
init.ora
b.Create an Oracle spfile from init.ora profile as follows:
Syntax
sqlplus /nolog
connect / as sysdba
create spfile from pfile;
exit
c.Call the restore and recovery function of BR*Tools.
Homogeneous System Copy Steps Needed.
-
su – adm
-
stopsap all
-
exit
-
su – ora
-
lsnrctl stop
-
exit
-
cd /oracle//
-
rm –rf sapdata?/*
-
rm –rf origlog?/*
-
rm –rf mirrlog?
-
rm –rf sapreorg/*
-
rm –rf saparch/*
-
rm –rf saptrace/usertrace/*
-
rm –rf saptrace/background/*
-
rm –rf sapbackup/*
-
rm –rf sapcheck/*
-
su – ora
-
cd sapbackup
-
brrestore -m full -b -c (det_log_file= for example bdkxxsrh.anf)
-
svrmgrl
-
su – ora
-
svrmgrl
-
su – ora
-
lsnrctl start
-
su – adm
-
startsap
STEP BY STEP SYSTEM COPY ( Backup Restore)
- Pre – Requisites :
- No of Drives should be same in both Source Server & Target Server. (Not Mandatory)
- Drive Names should be same in both Source Server & Target Server. (Not Mandatory)
- Installation of Database & SAP should be same in both Source Server & Target Server.
- STOP SAP & Oracle SERVICES AND EMPTY FOLLOWING DIRECTORIES :
- PLACE BACKUP FILE IN SAPBACKUP DIRECTORY
- Open Cmd Prompt And Run This Command
- Again Delete Oracle Control Files under these directories that comes after restoration
- Create trace file in source server using this command:
- to
- REUSE –> SET
- NORESETLOGS –> RESETLOGS
- Copy all archive logs to SAPDATA_HOME\oraarch & Run these commands
- Create Users as per note 50088.
- Start SAP Services.
SAP DB Refresh with Oracle as Database
- Take the offline backup of Production Server to disk
- Generate the backup of control file to trace using the following command.
- Copy the offline back and control file to Quality system for restoration.
- login as ora and execute the following command to start restore
System Refresh
Posted on April 26, 2014 by SAP Basis Admin
System refresh is nothing but moving the production system data to quality system for testing purpose.
Generally system refresh will be done when the client size is more and we cannot move the production system data to quality system.
Types of system refresh:-
- Using offline backup
- Using online backup Procedure:-Source system (Production)
- Take the screenshots of important T-code Ex: SCC4, SM58, ST06, SM36, SM37 and the clients specified t-cods.
- Export client settings – Table T000
- Printer settings – Table TSP03 and TSP03CORIn SPAD t-code we can export or import and delete the configuration
- RFC Destination – Table RFCDES Note: – For all the above we have to create the DUMY transport request in t-code SE01.
- Apart from this we also take the backup of user master record. For this we will export SAP_USR profile in SCC8 t-code.
- For all the transport requests we have to take down the transport number
.7. Take the clean offline backup (Will be done by backup team)
- Generate the control file using the command Alter database backup control file to trace File will be stored in path- oracle/SID/saptrace/usetrace
- Edit the control file as mentioned below. Delete above startup nomountb. Delete below character set UTFS; c. Replace Reuse to SET – Will change Source SID to Target SID.d. Replace No Reset log to Reset log – Will change the log sequence of offline redo log files. Replace Archiving to No Archiving – Will avoid creating log files while starting the system
- Save the control file as .sql or .trc.Target system (Quality)
- Delete all contents insideSapdata1, sapdata
2 to sapdataN, origlog A, origlogB, MirrorlogA, MirrorlogB, saptrace, sapreorg, sapcheckCommand to delete – rm –rf sapdata*
- Ask backup team to restore the source system backup to target systemNote: If we have root access no problem, if it is not there UNIX team will change root permission. Command is chown –r
Change the permission inside root
Command – chown –r data file name
- Run the script – DB will come to no mount state
- Then recover the database using the command Recover database using control file until cancel
- Execute command Alter database open reset log – It will reset redo log sequence number
- Then execute command – shutdown immediate
- Execute startup – will start oracle
- Change the OPS$ password – Through BRTOOLS – BRCONNECT – 8, 49.
Make background process ZeroRdisp/wp_no_btc=010.
Startup – Will start SAP Post activity:
- Import RFC definition, client settings, printer settings, Delete and configure SMQ1 and SMQ2
- Change the background parameter
- Restart the system If we are using online backup then we have do below mentioned steps.
- Perform point-in recovery
- To do point-in recovery we have to copy the oraarch directory from source system to target system. Command – Recover database using control file until time and date. After refresh if the system is not starting do the below steps.
- Check R/3 Trans is working or not Command- R3trans –d – It will check the connection between SAP and DB
- Delete source system OPS$ password
- Change OPS$ password through BRCONNECT option 8,
4Note: SQL file character will be changed in init.ora file Path: oracle/SID/102_64/dbs/init.ora oracle/SID/102_64/dbs/init.sap
SAP System Copy
- Homogeneous System Copy using Online / Offline Database Backup.
- Homogeneous System Copy using R3LOAD Procedure.
- Homogeneous System Copy using R3COPY Procedure.
- Preparations on Target System.
- Restore Online/Offline Backup of Source System onto Target System.
- Create CONTROLFILE creation script on Source System.
- Modification of CONTROLFILE script and creation of CONTROLFILEs of Target System.
- Recovery of Oracle Database on Target System.
- Completion of System Copy
- Both Source and Target Systems must have Same Operating System and Database System. Also Patch levels must be same.
- You have sufficient free space for sapdata directories on target system.
- For Windows systems, you have to create all drives where datafiles resides on source system.
- Use most current database backup in order to shorten database creation time.
- You have to resize the following file systems before restore process. Take into account sizes of source system.
- /oracle//sapdata1 /oracle//sapdata2 /oracle//sapdata3 /oracle//sapdata4 /oracle//sapdata5 /oracle//sapdata6 /oracle//saparch
- After cleaning necessary file systems/directories, you have to restore most current database backup to target system. For this, find the detail backup log (e.g. bdkxxsrh.anf) for that backup on source system. You can determine this from back.log summary backup log file or using DB12.


- Rename file name as CONTROL.SQL
- Open file to edit using VI (UNIX) or NOTEPAD (WIN).
- Remove all lines before “STARTUP MOUNT” line. Delete all commented “#” lines. Also remove all lines after CHARACTER SET WE8DEC;” line.
- Change all Source SID’s to Target SID via following commands.


- As your Hardware Key is not changed, you don’t have to get additional License Key from SAPNET. You can use previous systems (on target system, if SID is not changed) License in new system created on target system.
- Logon to the SAP R/3 System and goto TCODE SE06. Select “Database Copy or Migration” and execute “Post Installation Processing”.

- Delete old TMS configuration and make new configuration for TMS via STMS TCODE.
- After all of above steps, you have completed a System Copy using Online/Offline Database Backup
